# Installing tools on iOS device

<mark style="color:orange;">**Once you have jailbroken your iOS device using checkra1n, the next step is to install additional tools and packages to enable iOS pen-testing. One of the key tools you will need is Cydia, which is a package manager for jailbroken iOS devices.**</mark>

<mark style="color:red;">**Now add the below repos to your Cydia.**</mark>

[**1.https://cydia.akemi.ai/**](https://cydia.akemi.ai/)<mark style="color:green;">**, Karen’s Repo**</mark>

[**2. https://build.frida.re**](https://build.frida.re/) <mark style="color:green;">**, Frida Repo**</mark>

<mark style="color:red;">**
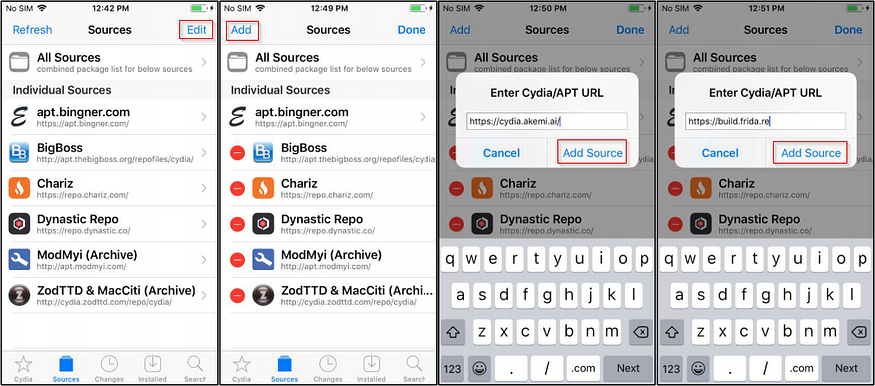
To add a repository to your iOS device using Cydia, follow these steps:**</mark>

1. <mark style="color:green;">**Start Cydia and go to**</mark><mark style="color:green;">**&#x20;**</mark><mark style="color:green;">**`Manage`**</mark><mark style="color:green;">**&#x20;**</mark><mark style="color:green;">**>**</mark><mark style="color:green;">**&#x20;**</mark><mark style="color:green;">**`Sources`**</mark><mark style="color:green;">**&#x20;**</mark><mark style="color:green;">**>**</mark><mark style="color:green;">**&#x20;**</mark><mark style="color:green;">**`Edit`**</mark><mark style="color:green;">**&#x20;**</mark><mark style="color:green;">**>**</mark><mark style="color:green;">**&#x20;**</mark><mark style="color:green;">**`Add`**</mark><mark style="color:green;">**.**</mark>
2. <mark style="color:green;">**Enter the URL of the repository you want to add and click on**</mark><mark style="color:green;">**&#x20;**</mark><mark style="color:green;">**`Add Source`**</mark><mark style="color:green;">**.**</mark>
3. <mark style="color:green;">**This will add the repository to your device and allow you to install packages from it.**</mark>

<figure><img src="https://miro.medium.com/v2/resize:fit:875/1*qitSdNwUG8wyPnTWczDWzQ.png" alt="" height="309" width="700"><figcaption></figcaption></figure>

<mark style="color:orange;">**
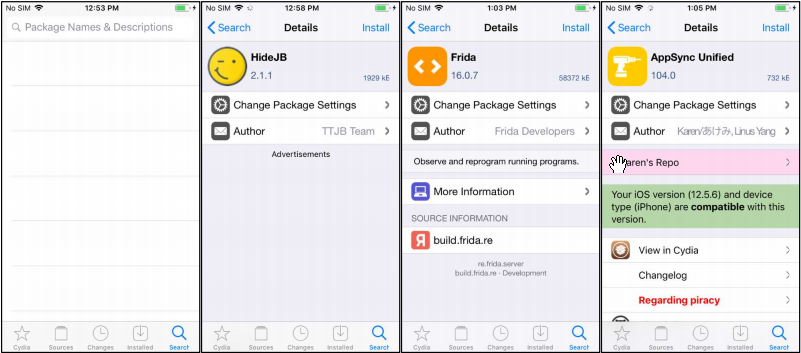
After adding repositories, you can use the**</mark><mark style="color:orange;">**&#x20;**</mark><mark style="color:orange;">**`Search`**</mark><mark style="color:orange;">**&#x20;**</mark><mark style="color:orange;">**feature in Cydia to find and install the packages you need for iOS penetration testing. Some of the key packages you will need include**</mark><mark style="color:orange;">**&#x20;**</mark><mark style="color:orange;">**`HideJB`**</mark><mark style="color:orange;">**,**</mark><mark style="color:orange;">**&#x20;**</mark><mark style="color:orange;">**`Frida`**</mark><mark style="color:orange;">**, and**</mark><mark style="color:orange;">**&#x20;**</mark><mark style="color:orange;">**`Appsync Unified`**</mark><mark style="color:orange;">**. You can search for these packages by name and install them using Cydia.**</mark>

**Here are the steps to install a package from Cydia:**

1. <mark style="color:green;">**Open Cydia and go to the**</mark><mark style="color:green;">**&#x20;**</mark><mark style="color:green;">**`Search`**</mark><mark style="color:green;">**&#x20;**</mark><mark style="color:green;">**tab.**</mark>
2. <mark style="color:green;">**Enter the name of the package you want to install (e.g.**</mark><mark style="color:green;">**&#x20;**</mark><mark style="color:green;">**`HideJB`**</mark><mark style="color:green;">**) and press**</mark><mark style="color:green;">**&#x20;**</mark><mark style="color:green;">**`Enter`**</mark><mark style="color:green;">**&#x20;**</mark><mark style="color:green;">**to search for it.**</mark>
3. <mark style="color:green;">**Locate the package in the search results and tap on it to open the package page.**</mark>
4. <mark style="color:green;">**Tap on**</mark><mark style="color:green;">**&#x20;**</mark><mark style="color:green;">**`Install`**</mark><mark style="color:green;">**&#x20;**</mark><mark style="color:green;">**to begin the installation process.**</mark>
5. <mark style="color:green;">**Cydia will download and install the package on your device. Once the installation is complete, you can use the package as needed.**</mark>

<figure><img src="https://miro.medium.com/v2/resize:fit:875/1*zspQl6jHi66ytguiaStBYw.png" alt="" height="309" width="700"><figcaption></figcaption></figure>

<mark style="color:orange;">**In addition to these packages, you will also need to install SSL Kill Switch 2 and Otool manually. To do this,**</mark>

<mark style="color:green;">**1.Use the**</mark> <mark style="color:blue;">**`ssh`**</mark>**&#x20;**<mark style="color:green;">**command to connect to your jailbroken iOS device as the**</mark>**&#x20;**<mark style="color:blue;">**`root`**</mark>**&#x20;**<mark style="color:green;">**user.**</mark>

<mark style="color:green;">**2. Navigate to the**</mark>**&#x20;**<mark style="color:blue;">**`/tmp`**</mark>**&#x20;**<mark style="color:green;">**folder using the**</mark>**&#x20;**<mark style="color:blue;">**`cd`**</mark>**&#x20;**<mark style="color:green;">**command.**</mark>

<mark style="color:green;">**3. To download “SSL Kill Switch 2" use**</mark>**&#x20;**<mark style="color:blue;">**`wget`**</mark><mark style="color:green;">**command,**</mark> <mark style="color:blue;">**`wget`**</mark> [**`https://github.com/nabla-c0d3/ssl-kill-switch2/releases/download/0.14/com.nablac0d3.sslkillswitch2_0.14.deb`**](https://github.com/nabla-c0d3/ssl-kill-switch2/releases/download/0.14/com.nablac0d3.sslkillswitch2_0.14.deb) **`.`**

**4.&#x20;**<mark style="color:green;">**Install the package using**</mark> <mark style="color:blue;">**`dpkg -i com.nablac0d3.sslkillswitch2_0.14.deb`**</mark>

**5.&#x20;**<mark style="color:green;">**Restart the SpringBoard**</mark> <mark style="color:blue;">**`killall -HUP SpringBoard`**</mark> <mark style="color:green;">**to complete the installation.**</mark>

**6.&#x20;**<mark style="color:green;">**After this install**</mark>**&#x20;**<mark style="color:blue;">**Otool**</mark>**&#x20;**<mark style="color:green;">**using command ,**</mark> <mark style="color:blue;">**`apt install otool`**</mark>

<figure><img src="https://miro.medium.com/v2/resize:fit:875/1*h79iKnuPQ_hU77HlUYiedg.png" alt="" height="278" width="700"><figcaption></figcaption></figure>

<mark style="color:orange;">**
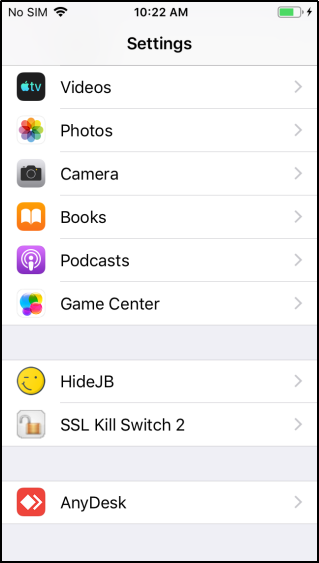
After completing these steps, you should be able to see “Hide JB” and “SSL Kill Switch 2" in the Settings menu on your iOS device. The Otool utility can be accessed using a shell, so we need to establish an ssh connection to the iOS device in order to use it..These tools will be essential for iOS pen-testing, so make sure they are installed and configured properly.**</mark>

<figure><img src="https://miro.medium.com/v2/resize:fit:399/1*XEEJ6kW39ZwWV4E-W2FsNA.png" alt="" height="563" width="319"><figcaption></figcaption></figure>

<mark style="color:orange;">**After setting up your environment for iOS pen-testing and installing the necessary tools and packages on your jailbroken iOS device, the next step is to add the Burp certificate to your device. This will allow your device to trust the SSL/TLS certificates that are generated by Burp, which is essential for using Burp to intercept and analyze the network traffic of iOS applications.**</mark>

**To add the Burp certificate to your iOS device, follow these steps:**
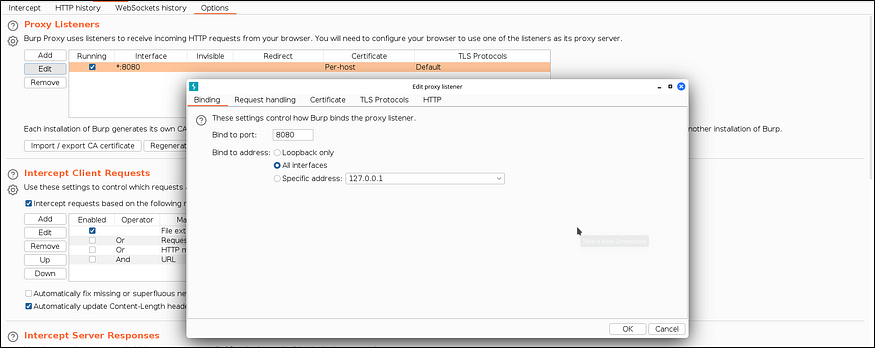
1. <mark style="color:green;">**Open Burp and go to the**</mark>**&#x20;**<mark style="color:blue;">**`Proxy`**</mark><mark style="color:blue;">**&#x20;**</mark><mark style="color:blue;">**>**</mark><mark style="color:blue;">**&#x20;**</mark><mark style="color:blue;">**`Options`**</mark><mark style="color:blue;">**&#x20;**</mark><mark style="color:blue;">**>**</mark><mark style="color:blue;">**&#x20;**</mark><mark style="color:blue;">**`Proxy Listeners`**</mark>**&#x20;**<mark style="color:green;">**tab.**</mark>

<figure><img src="https://miro.medium.com/v2/resize:fit:875/1*ZBqPi4bFACzO88i0HBOIZA.png" alt="" height="279" width="700"><figcaption></figcaption></figure>

<figure><img src="https://miro.medium.com/v2/resize:fit:875/1*ZBqPi4bFACzO88i0HBOIZA.png" alt="" height="279" width="700"><figcaption></figcaption></figure>

**3.&#x20;**<mark style="color:green;">**On your iOS device, go to**</mark>**&#x20;**<mark style="color:blue;">**`Settings`**</mark><mark style="color:blue;">**&#x20;**</mark><mark style="color:blue;">**>**</mark><mark style="color:blue;">**&#x20;**</mark><mark style="color:blue;">**`Wi-Fi`**</mark> <mark style="color:green;">**and click on the Wi-Fi network you are connected to.**</mark>

**4.&#x20;**<mark style="color:green;">**Select**</mark> <mark style="color:blue;">**`Configure Proxy`**</mark><mark style="color:blue;">**,**</mark> <mark style="color:green;">**choose**</mark> <mark style="color:blue;">**`Manual`**</mark><mark style="color:blue;">**,**</mark>**&#x20;**<mark style="color:green;">**and enter the IP address and port of your laptop**</mark>**&#x20;**<mark style="color:blue;">**(e.g.**</mark><mark style="color:blue;">**&#x20;**</mark><mark style="color:blue;">**`192.168.0.1:8080`**</mark><mark style="color:blue;">**).**</mark> <mark style="color:green;">**Save the changes.**</mark>

<figure><img src="https://miro.medium.com/v2/resize:fit:875/1*CB6ELJe9LRh30eWmGri2qA.png" alt="" height="411" width="700"><figcaption></figcaption></figure>

<mark style="color:green;">**
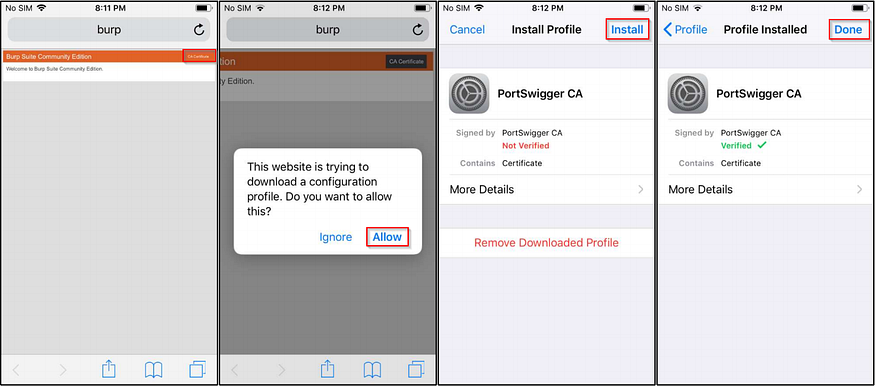
5. Open the Safari browser on your iOS device and enter**</mark> <mark style="color:blue;">**`http://burp`**</mark><mark style="color:blue;">**.**</mark> <mark style="color:green;">**Download the Burp certificate and click on**</mark> <mark style="color:blue;">**`Allow`**</mark><mark style="color:blue;">**.**</mark>

**6.&#x20;**<mark style="color:green;">**In the**</mark> <mark style="color:blue;">**`Settings`**</mark> <mark style="color:green;">**app, go to**</mark> <mark style="color:blue;">**`General`**</mark><mark style="color:blue;">**&#x20;**</mark><mark style="color:blue;">**>**</mark><mark style="color:blue;">**&#x20;**</mark><mark style="color:blue;">**`Profile`**</mark><mark style="color:blue;">**&#x20;**</mark><mark style="color:blue;">**>**</mark><mark style="color:blue;">**&#x20;**</mark><mark style="color:blue;">**`PortSwigger CA`**</mark> <mark style="color:green;">**and click on**</mark> <mark style="color:blue;">**`Install`**</mark><mark style="color:blue;">**.**</mark>**&#x20;**<mark style="color:green;">**Click on**</mark> <mark style="color:blue;">**`Done`**</mark> <mark style="color:green;">**to complete the installation.**</mark>

<figure><img src="https://miro.medium.com/v2/resize:fit:875/1*Qqvml5qqo4npcpa2yWXUYg.png" alt="" height="309" width="700"><figcaption></figcaption></figure>

<mark style="color:green;">**7. Now in the Settings app, go to**</mark> <mark style="color:blue;">**`General`**</mark><mark style="color:blue;">**>**</mark><mark style="color:blue;">**&#x20;**</mark><mark style="color:blue;">**`About`**</mark><mark style="color:blue;">**>**</mark><mark style="color:blue;">**&#x20;**</mark><mark style="color:blue;">**`Certificate Trust Settigns`**</mark><mark style="color:green;">**and Enable the PortSwigger CA certificate by toggling the switch next to it.**</mark>

<figure><img src="https://miro.medium.com/v2/resize:fit:875/1*Ad_2I0sB_ewun8ad0tmfdw.png" alt="" height="308" width="700"><figcaption></figcaption></figure>

<mark style="color:red;">**After completing these steps, the Burp certificate will be added to your iOS device and you will be able to capture the network traffic of the device.**</mark>
